Dr. Zocchi is now selling replacement parts for the Alps:
Fortunately the Fox Alps series of shocks are still decent performers today, and are a good option to run on older frames. However, they require regular maintenance, since, aside from cleaning, the oil level is critical in the Alps. Fox no longer supplies parts or information for them.
Risse Racing will still service them, but in my experience they need to be serviced frequently.
Working on shocks can be dangerous. Always wear eye protection when working on suspension.
Rebuilding a 4R and 5R are very similar, with a couple noted exceptions. Nothing is reverse threaded on the Alps. The 4 is similar to the 5R in that they both use a bleed port, however, the 4 damper piston is overly complicated and requires a special tool to remove, and therefore is not specifically covered here.
* Store the shock between rides without air pressurize. It can prevent several issues from forming.
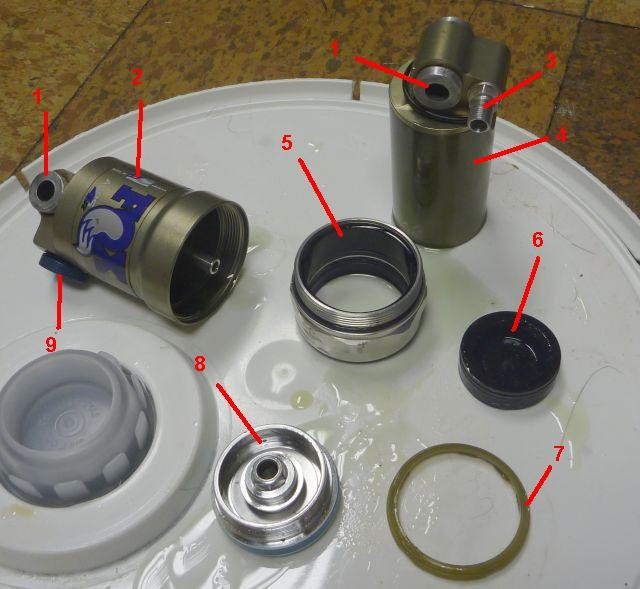
Parts of the shock:
1. eyelet bushing
2. body
3. air valve
4. shaft
5. gland nut
6. IFP
7. urethane top out bumper
8. damper piston (negative coil spring not shown)
9. rebound adjuster
Parts List:
1x 222 quad ring (
www.mcmaster.com)
1x 216 quad ring (5R) (
www.mcmaster.com)
2x 216 quad ring (4R) (
www.mcmaster.com)
1x 029 o-ring (
www.mcmaster.com)
1x 008 o-ring (
www.mcmaster.com)
1x AN-17 wiper (5R gland nut) (
www.hydraulic-supply.com,
www.amazon.com/dp/B01CYJQINC)
suspension oil (around 32cSt@40C)
* All seals should be nitrile or Buna-N rubber.
1. The absolute first step is to release all the air and de-pressurize the shock. Be sure to record the pressure before doing so. Once it’s empty remove the valve core entirely.
SERIOUS INJURY CAN OCCUR BY SKIPPING THIS STEP.
NEVER WORK ON A SHOCK WITH PRESSURE IN IT!
2. Clamp the big gland nut using a vise. Use metal inserts to protect the aluminum nut from the vise’s teeth. I use steel downhill tire levers. If the bushings are left in the body a rod through the bolt hole can be used to provide enough leverage to loosen the nut. I usually use remove the bushings and use a long 3/8" socket extension through the eyelet. If this is the first time the shock has been opened, the nut will be very tight.
If the IFP seal has failed, the oil in the body can be pressurized. Take precautions when opening the shock.
 |
| Loosening the gland nut. |
3. Have a bucket handy to catch the oil. Finish unscrewing the nut over top of the bucket, and pull the two halves of the shock apart. Frequently the urethane top out bumper will get stuck in the can, and then needs to pulled hard to pop it out as the halves are pulle apart.
 |
| Separating the halves. |
4. Empty the oil out of both halves. Take a pin spanner and use it hold the end of the damping piston on the bottom of the shaft. On the 4R use the holes on the bottom of the piston, and on the 5R use the grooves on the inside edge of the piston. While holding the piston turn the shaft using the eyelet. Once it gets going, finish unthreading it by hand and remove the piston. Remove the gland nut from the shaft. Clean both body and shaft of old oil.
When removing the damper piston the coil negative spring in visible. On most 4R shocks and some 5R shocks the coil spring will be fractured. This happens because when the shock is aired up the coil spring is compressed, and it fatigues over time. If it's broken, and it's being replaced, one need's to cannibalized from another shock. The 4R and 5R springs are not interchangeable, and the 5R springs are more durable and less prone to failure. If the spring is removed more oil needs to be added during the bleed to keep the IFP from topping out against the piston.
 |
| Removing damper piston. |
 |
| Pin spanner. |
5. Connect a pump to the valve and pop the IFP out of the shaft. A floor pump is useful due to the higher volume of air.
* If I recently replaced the o-rings and I'm just servicing the shock to clean it, I won't remove the IFP.
6. Remove the inside quad-ring, outside o-ring, and wiper from the gland nut, the quad-ring from the IFP, and the quad-ring from the bottom of the damper piston (not present on 5R). Clean all the parts.
 |
| Removing quad-ring main seal. |
7. Inspect the shaft, negative coil spring, compression shims, and rebound shims (located on bottom of damper piston on 5R and not present on 4R) for any cracks. If any are found, parts need to cannibalized off another Alps since they’re not standard sizes; of those parts, only the compression shims are shared between the 4R and 5R. Inspect and clean the urethane top out bumper, and replace if necessary. As it’s not a standard part it needs to cannibalized one from another shock. The 4R and 5R use the same top out bumper. Inspect the 4R wiper for any cracks or hardening. It uses a proprietary wiper, so if it needs to be replaced it either need to be pulled from another shock, or the gland nut needs to be upgraded to the 5R (it's a direct upgrade) which uses a standard AN-17 wiper. On the 5R simply replace the wiper with a new one.
8. Install new quad-rings and o-rings, lightly covering them with oil before installation. The large quad ring is a 222, while the small quad rings are a 216. The large o-ring is a 029. Apply a fine layer of high quality grease to the inside of the wiper.
9. Fill the body with suspension oil of choice and set it aside, making sure not to spill any oil and that it’s close by.
10. Wipe 80w gear oil on the inside of the shaft and install the IFP, making sure the concave side is facing out, and push it in until it stops. Install the gland nut on the shaft again, and then fill the shaft completely with oil and screw the damper piston back on. Use the pin spanner to snug the piston down. If a bullet tool isn't used for the gland nut installation, the quad-ring needs to be gently pushed into place around the edge of the shaft as the gland nut on slides on.
11. Holding the parts over your oil bucket, pour some more oil on top of the damper piston, and then quickly invert it onto the body and quickly push the gland nut into place and tighten it down. A little oil will probably need to be bled out as the two halves are tightened together. I'll frequently have the bleed port (see step 11) on the body open and facing upward to allow the excess oil to escape.
11. For the 4R the rebound adjuster needs to be removed since its hole doubles as the bleed port. Remove the grub screw located on the bottom of the can. Beneath it is a second grub screw with a hard sealant on it. Remove the sealant with a needle or dental pick and remove the second grub screw. Pull the rebound adjuster out and remove the small ball bearing which was between the grub screw and rebound adjuster. Remove the o-ring from the rebound adjuster’s shaft and replace it with a lightly oiled 008 o-ring. Keep the shock body up until the rebound adjuster has been reinstalled (step 13). For the 5R simply remove the allen screw on the opposite side from the rebound adjuster – that’s the bleed port. Replace the o-ring with a lightly oiled 008. Keep the shock upside down until the bleed screw has been reinstalled (step 13).
 |
| 4R rebound adjuster with its grub screws and ball bearing. |
12. I bleed Alps shocks using the immersion method. The older syringe method of bleeding is at the bottom of the article.
First, clean the inside and outside of the shock very well, and inflate the shaft side of the shock to about 50 PSI. Then fill
the body of the shock with oil, the fill a gallon Ziploc bag with about 3/4 to 1 quart of suspension oil, place both halves of the shock in
the bag, and press all out the air and seal the bag. Have someone hold a
corner of the bag, or clamp it in a vise, to free both your hands.
"Burp"
both halves of the shock to get any residual air out. Slowly rotate the shaft to bleed air
from the damper head bleed holes; if I see bubbles come out of a damper
head bleed hole, I'll rotate it back and forth there to get all the air
out.
Assemble two halves of the shock through the bag, making sure not to
let any residual air in the bag into the shock. Get the two halves as tight as you make them by hand; it'll be enough to
keep oil from leaking out. The oil will eventually soften the Ziploc
bag, so don't take too long.
 |
| Immersion bleeding with a Risse Racing Shock. |
Remove the shock from the bag with the bleed port facing up, with the shock tilting slightly up toward the bleed hole. You want to keep it at the highest point of the shock.
Pour the remaining oil in the bag back into its bottle.
13.
On the 5R simply reinstall the bleed port screw and finish tightening down the gland nut.
On the 4R reinstall
the rebound adjuster, and then drop the ball bearing down the grub screw
hole. Clean the grub screw hole of as much oil as possible (I usually
use a pipe cleaner dipped in alcohol), apply thread locker to a grub
screw, and screw it into the hole. Tightening the grub screw down will
make the rebound adjuster harder to turn, while loosening it will make
it easier to turn. Adjust the grub screw until the rebound adjuster
turns stiffly. At this point, finish tightening down the gland nut. Then apply more thread locker on top of the grub screw, wait
for it to harden for a bit, and then install the second grub screw,
snugging it down on top of the first one. Check the rebound adjuster to
make sure it can still turn.
14. Remove the top and
bottom bushing, clean, grease, and reinstall. Clean the outside of the
shock with alcohol to remove as residual oil. Snug the gland nut using
the vise. It doesn’t need to be really tight. Reinstall it on the bike
and air it back up.
* NOTE* I no longer used the syringe method of bleeding. Instead I'm using the immersion method which is much faster and more foolproof. I have the syringe method listed here for archival purposes only.
For the 5R thread a syringe into the bleed port, and on the 4R press a syringe into the rebound adjuster hole (the MixMizer syringe works well) and pour some oil into the syringe. Gently compress the shock several times to help remove air from around the damper piston. Keep the bleed port at the highest point of the shock. Hook up a shock pump to the valve, and then slowly start to apply air. As the pressure increases, the IFP will be force toward the damper piston, displacing the oil in the shaft. The extra oil will flow out the bleed port. Once there's about 50psi in the shock, the IFP will have moved as far as it’s going to. Keeping compressing the shock and adjusting its angle to help work all the air out. I'll check the bleed by taking the syringe off, blocking the hole, and shaking the shock by my ear. If I hear splashing then there’s still air in the oil. I'll usually need to bleed it, shake it, and then bleed it again.
If the negative coil spring was removed, once I have a good bleed, I de-pressurize the shock and use the syringe to force 3-6ml of oil back into the shock. This will move the IFP 3-6mm up into the shaft and away from the damper piston. More oil make the shock more progressive. If it's short travel, then I usually only 3ml.
 |
| 4R during bleed. |
 |
| Demonstrating bleed syringe in 5R body. |